


 Membership
Like a lot of Harley-Davidson enthusiasts, I viewed the FXR as the motor company's shining jewel, the best it had to offer, only to be taken away too soon. As I quickly found out when I got my hands on one, in reality it wasn't great but I liked it.
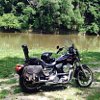
If you ask the greybeard at your local watering hole what's the best handling Harley ever produced, you will likely get the FXR as your answer. And over the past 10 years or so the model has become a cult classic, garnering praise as this white whale of a motorcycle to be coveted as the best performing H-D. I hadn't spent any time on an FXR when I had the opportunity to purchase one my Dad found a few states away. It was a mostly bone-stock 1989 FXRS-SP. I already had a hot-rod Dyna in my garage but jumped at the chance to own this mythical machine.
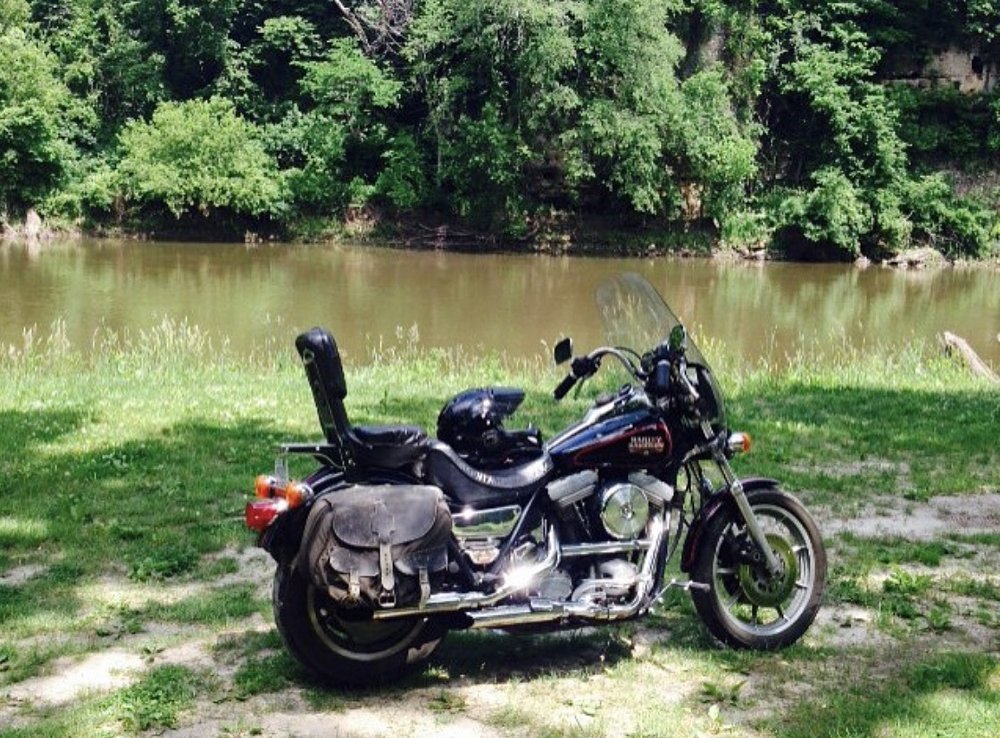
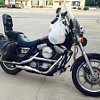
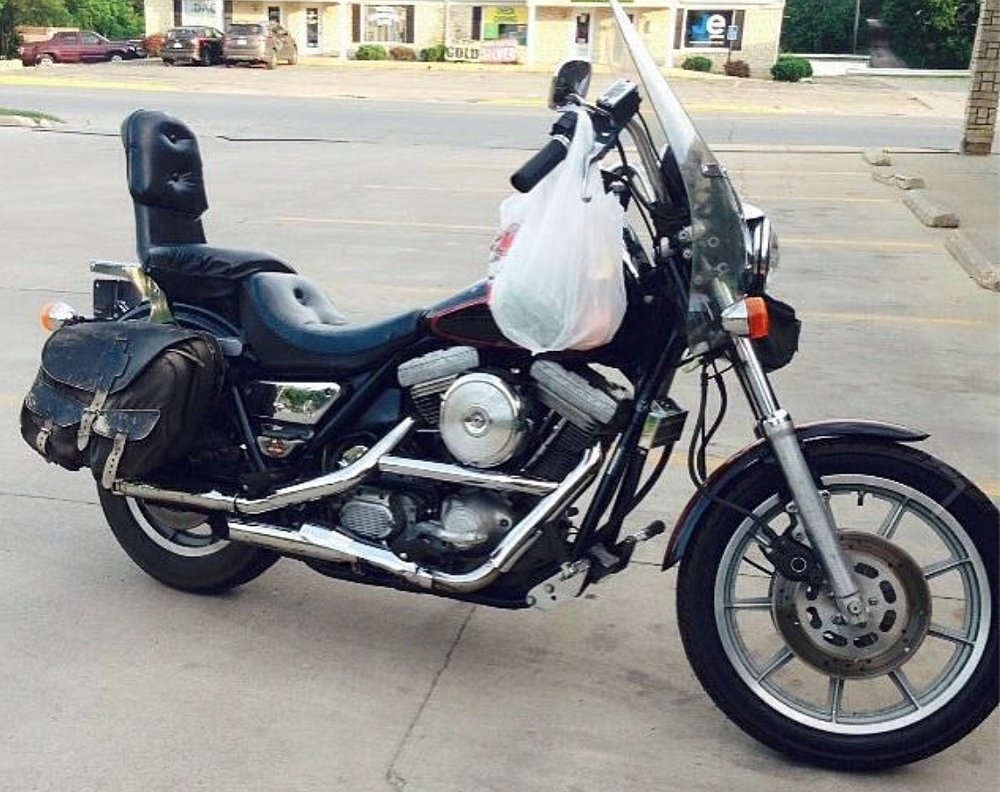
What I quickly learned was that it was slow, actually did handle decently, stopped like shit, and I really liked it. It was kind of goofy looking with its stock buckhorn-style handlebar, billboard windshield, crappy air forks, and OEM leather bags, but it was ultra comfortable to ride and my wife loved riding on it (that's rare) so I kind of fell in love with the bike just as it was. Over the next few years, I just rode the bike in stock configuration, except for the set of slip-on mufflers that was on it when I purchased it. Eventually, I put a T-Sport-style fairing on it that I scored out of the J&P clearance tent with a broken windscreen and swapped the bar for my favorite handlebar, a Biltwell tracker.
I continued to put miles on the bike, until eventually the stock 80-inch Evo mill just kind of laid over and died. I figured this was as good a sign as I would get to finally give the FXR the makeover it deserved. I pulled the entire thing apart all the way down to the frame and scored the engine of a lifetime for the rebuild. I managed to get hold of a S&S Cycle T124 "tweevo" motor. Only a few "tweevo" engines were ever produced. They were Twin Cam-style engines with Evo mounts, meaning you can basically bolt them right into the bike without having to do all of the extensive frame and driveline modifications it would normally take to convert a Evolution-powered FXR to a late-model-style Twin Cam engine. And as a cherry on top it was a whopping 124 cubic inches, easily capable of 140 rear-wheel horsepower.
Needless to say, I was stoked, but over time my excitement faded as life took over and the bike took a back seat to general day-to-day expenses and responsibilities. I kept collecting parts whenever and wherever I could with the build always rolling around in my head.
Over the next few years, I evolved as a rider while the bike sat. I sold my hot-rod Dyna and bought dirt bikes and ADV bikes instead of parts for my forlorn H-D. My job at J&P Cycles keeps me extremely connected to the H-D aftermarket scene and I get to build and ride custom bikes, but on my personal time I kind of abandoned riding V-twins for a minute while I explored new things.
But some things never change and I still appreciated a good-handling, hard-accelerating Harley. To some folks, terms like acceleration and handling are an oxymoron and laughable at best when it comes to a Harley-Davidson, but to folks like me, addressing those shortcomings is where the fun lies. So the FXR project still gnawed at me and I still had an itch to build a hot-rod Harley.
Time to scratch that itch
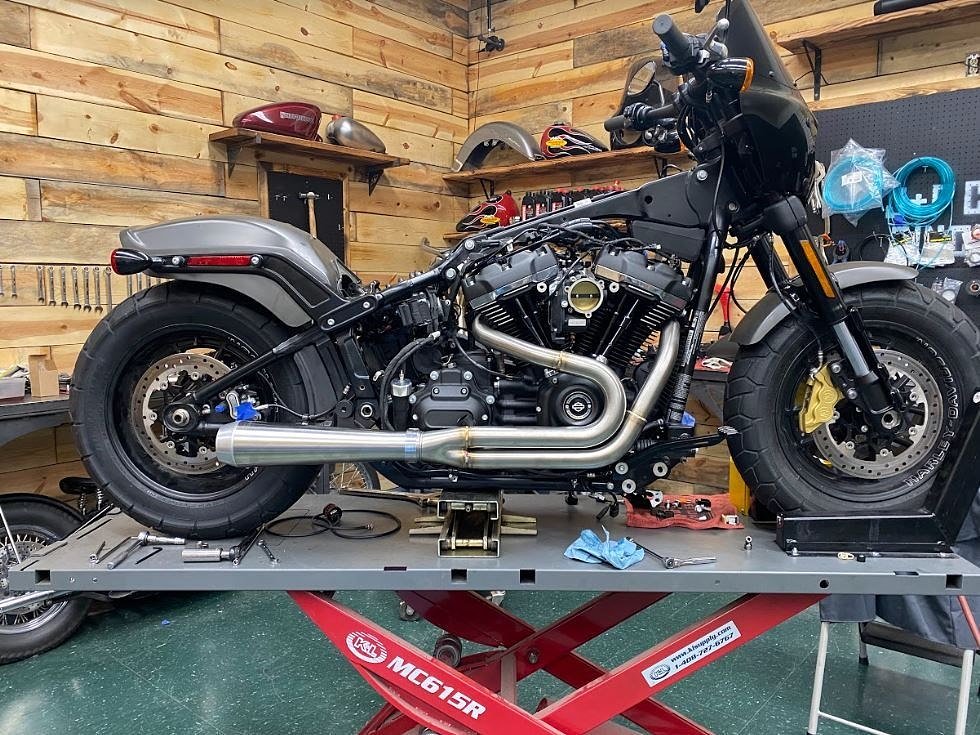
I finally had enough parts to make a run at the project and I had an idea about how I wanted to build the bike. I like how "club style" bikes are set up, with mid-controls, short T-bars, two-into-one exhaust — you know, the regular Instagram cool guy stuff. But that's exactly what I wanted to avoid at the same time. I was focused on a few things, and functionality was at the top of the list, along with my normal quest for big, streetable horsepower.
I had the horsepower covered with the T124, but the rest of the bike needed help. What I had learned from riding the bike in stock trim over the years was that the chassis has good bones but the rest of the bike honestly sucked. The suspension was garbage, the brakes were really bad, and the tapered shaft style transmission was one snap of the wrist away from leaving you thumbing for a ride.
What I came around to was that the only original parts I was going to use were the frame and swingarm, the sheet metal, wheels, and fork tubes. I wasn't looking for a flashy paint job or finishes, I wanted the function of the bike to be the star. I really dig the restomod-style hot rods and the patina-painted cars and trucks that inevitably are hiding 800-horsepower LS engines under the hood, sitting on modern suspension and brakes.
So that's the direction I headed. Basically I wanted my monster motor to be complemented by real-world-capable components while looking like it was pulled from an old barn.
Frame, suspension, and wheels
The frame was in phenomenal shape considering it is 30-plus years old. And I didn't want to strip and powdercoat the entire thing because it would lose the old patina look I was aiming for. So I sanded a few spots where the paint was bare, rattle canned the spots and moved on.
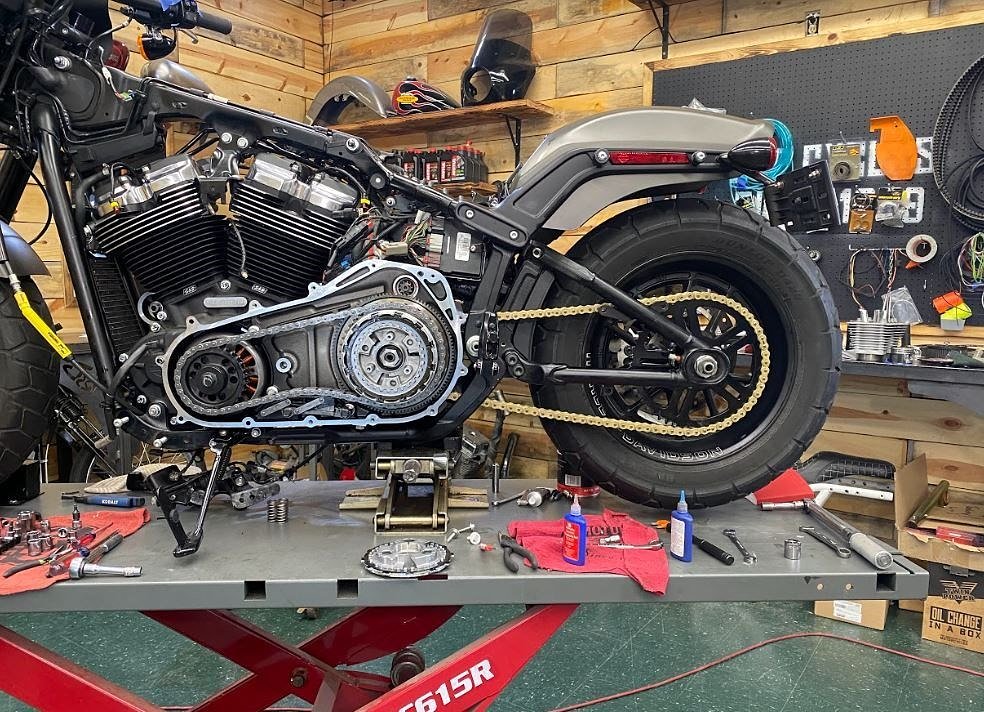
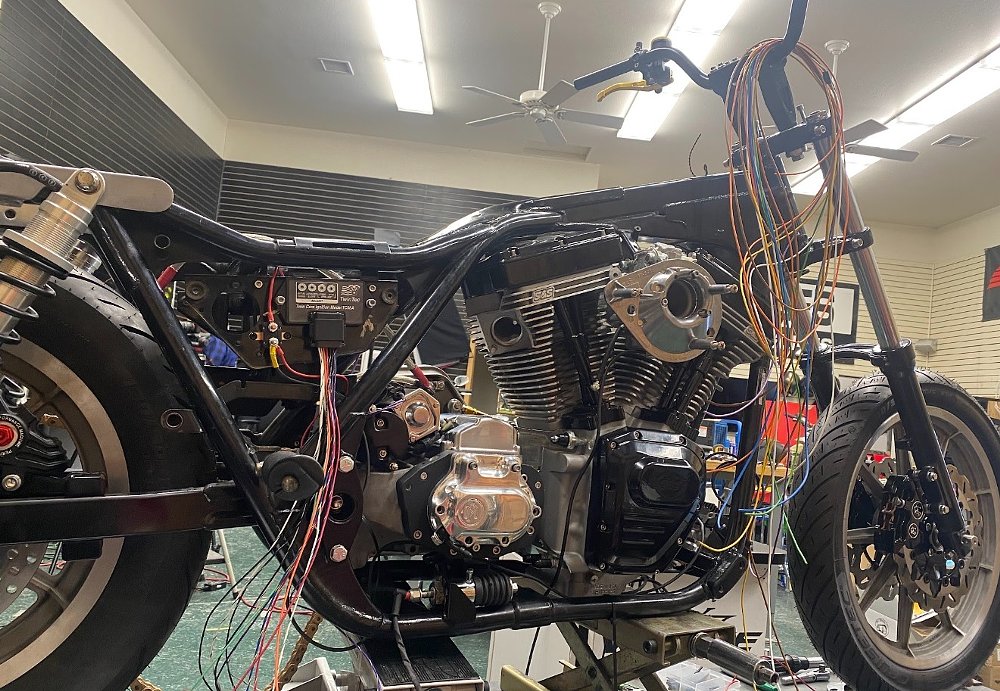
The FXR uses a cleve block system for the swingarm pivot that doubles as a rear mount for the transmission and that old system is a major weak point in an otherwise pretty trick design. The best way to address this flaw is a spherical steel bearing upgrade. I ditched the cleve blocks for the steel bearing upgrade and added a Bareknuckle Performance stainless steel pivot shaft to make the frame and swingarm combo as bulletproof as I could.
The FXRS-SP and the FXRT models came from the factory with two-inch-over fork tubes, which In my opinion helps those models feel extra light on their feet. I wanted to keep the longer fork tubes but the internal air fork setup from 1989 is terrible and there aren't many brake options for pre-2000 Harley fork lowers. My solution was to replace all the internals with Racetech springs and Gold Valve Emulators and swap out the lower legs for some 2003 Sportster legs. After some fresh black powdercoat on the triple trees and lower legs, I had my front end assembled.
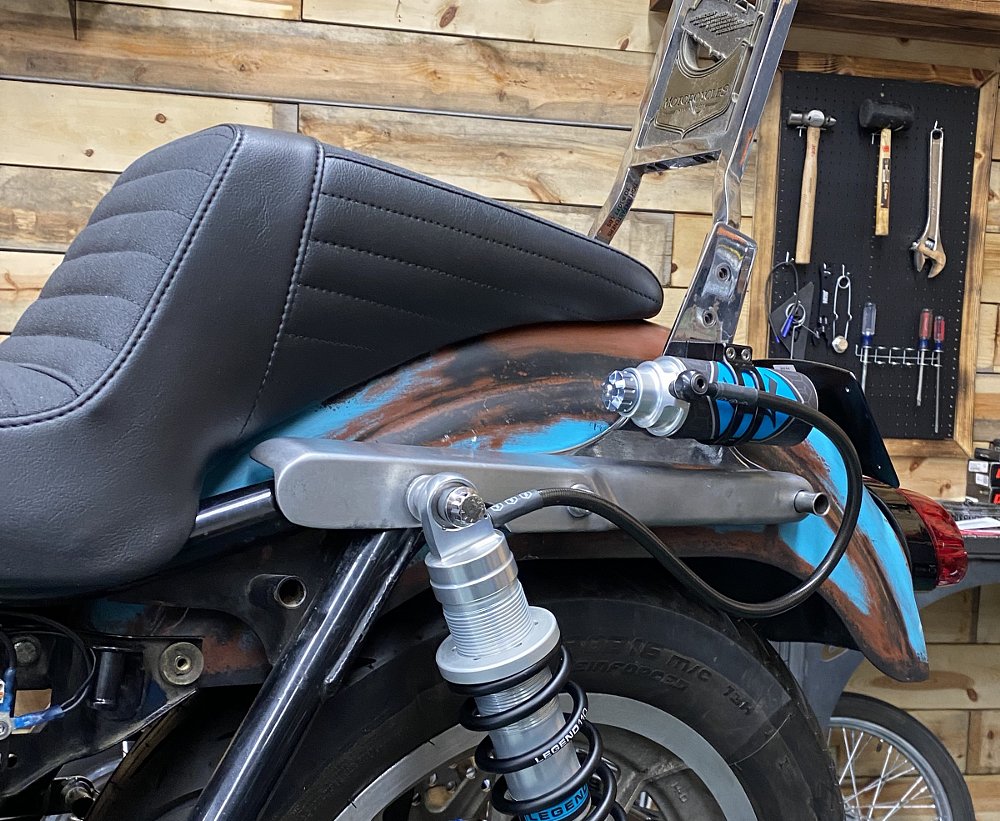
For the rear suspension, I had a bit of an issue. I wanted to run the old leather bags that come on the FXRS-SP "convertible" models. But that wouldn't allow me to run a reservoir-style shock. It's the same issue late-model baggers run into. The solution is to run the shock reservoir farther away on a longer line so it doesn't interfere with the bags. Unfortunately, shocks like that aren’t available for FXRs. But after a conversation with Legend Suspension, they had me dialed in with a set of bagger-style REVO ARCs that were sprung for an FXR and I mounted them with some stainless ARP hardware from Bare Knuckle Performance. I got creative with the reservoir mounting on the sides of the factory sissy bar and it ended up looking pretty sharp.
For the wheels, I stuck with the stock cast factory wheels. I felt that opting for a billet wheel of some sort wouldn't stylistically jive with what I was aiming for, and I also hate cleaning wheels. I did convert the Timken bearings to sealed bearings and wrapped them in my favorite sticky cruiser tire, Metzeler Cruistecs.
Engine and drivetrain
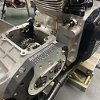
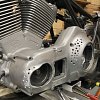
I had an absolute monster in the form of my S&S T124 to power my machine but there was something I didn't like about it: the chrome engine covers. So I pulled the shiny chrome bits off my brand new mill and sent them out to be powdercoated black. And while I had the rocker covers off I pulled out the stock ratio roller rockers and upgraded them to a set of 1.725 ratio roller rockers because I just can't leave things alone.

The stock transmission was the old tapered shaft keyway style that basically holds everything together with one small piece of metal (key), which means it would last about 15 seconds while it was attached to that 124-inch motor. Realistically, there was only one choice for me when it came to the transmission and that was Baker Drivetrain. Based in Michigan, Bert Baker and crew revolutionized the Harley-Davidson drivetrain game years ago and still are the industry leaders. I didn’t want to worry about shearing gears no matter how much I beat on this bike and I knew Baker was the only company that could provide me with that level of performance and durability. I ended up with an American-made Baker OD6 that fit right inside my stock transmission case. Not only is it good for up to a staggering 165 foot-pounds of torque, due to its diamond-cut gearset made from 8620 steel, but it also gave me an extra gear! I also had an option of shift patterns and I ultimately chose to move away from the traditional one down, four up pattern to a neutral on bottom, all six up pattern. It was almost a shame to cover up the gearset. It is delightfully overbuilt and the gears look like jewelry.
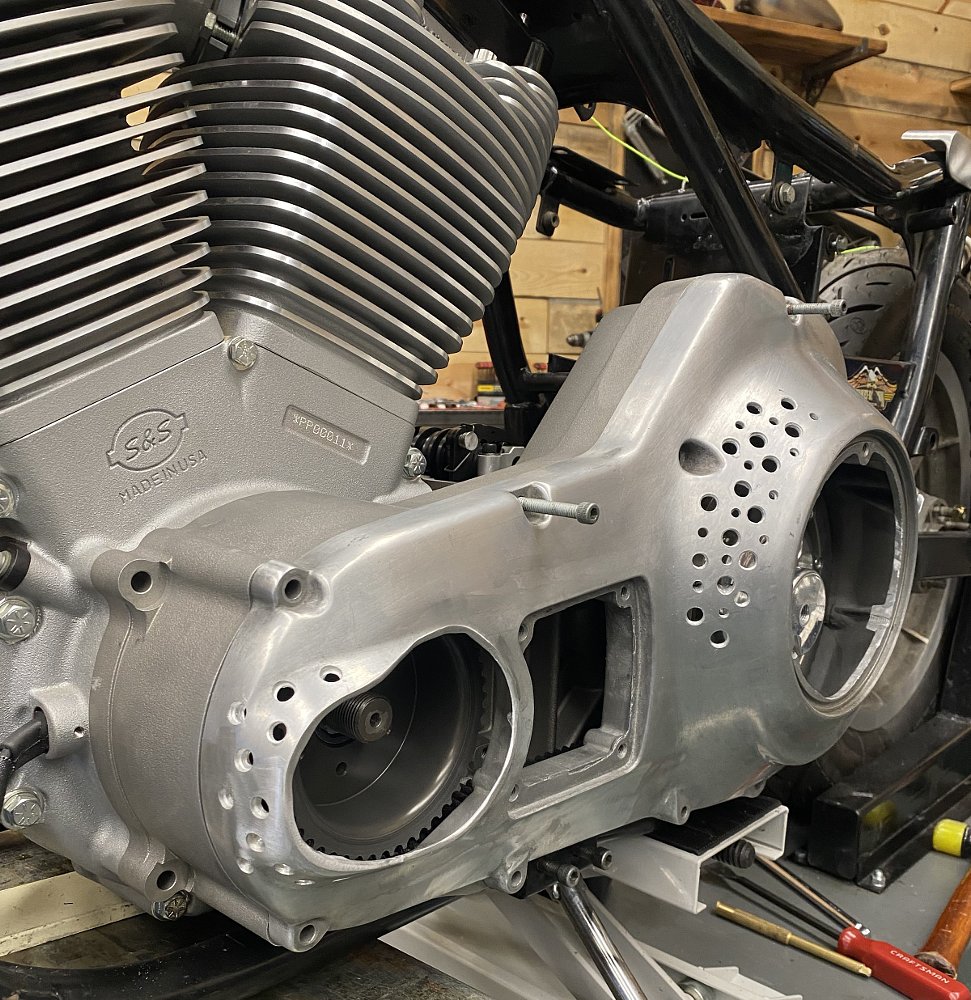
Moving on down to the primary drive I went a bit outside the box. I opted for a BDL enclosed belt drive that I made kind of not enclosed. I chopped up my stock primary cover to expose the hot rod dry clutch and belt drive that reside underneath. The Swiss cheese aluminum cover that I hit with a Scotch-Brite pad to dull the finish also has the added functionality of keeping the belt and clutch system cool. For my final drive, I opted for a chain and sprockets, giving me the ability to to adjust my gearing.
Brakes and controls
I kept the stock dual-disc format when I upgraded to my later model fork lowers because I wanted the bike to stop as well as it went. I thought about running some adapters and mounting some radial-mount calipers but I wanted to keep the classic look I was aiming at. So I bolted on some four-piston Performance Machine calipers to the front of the bike and have them biting some Galfer wave rotors for plenty of stopping power.
Out back I added another Performance Machine caliper, this time using one of their vintage units. I did go a bit fancier on the hand controls, using some Performance Machine radial master cylinders trimmed in gold for both the brakes and clutch, a color I would throw in here and there throughout the build. At the other end of that clutch master cylinder was a Performance Machine clutch actuator mated to the end of the Baker transmission.
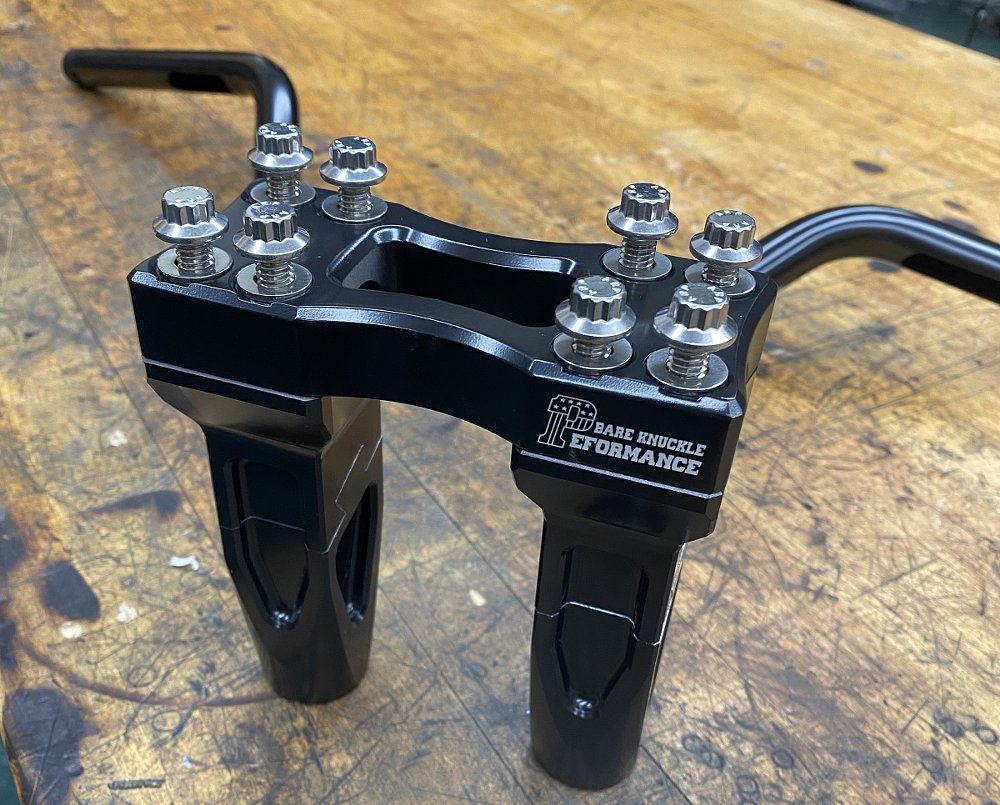
The master cylinders were perched upon my go-to setup when it comes to handlebars, Biltwell Tracker High bars and Torker grips. Perched atop of them is a set of Ness Mini Stocker mirrors that accomplish a feat that most mirrors have difficulty with: They look great and you can see out of them. Holding all of that up is a Bare Knuckle Performance set of five-inch Flex Modular risers. They are a genius set of billet machined risers that can be flipped to go from a straight riser to a pullback style riser and are finished out with stainless 12-point ARP stainless hardware.
Intake, exhaust, ignition, and wiring
Fueling the big powerplant is a Mikuni HSR45 carburetor. The engine was initially set up for fuel injection but the top motor mount directly interfered with the injectors and throttle body. So I opted for the Mikuni carb, which I have used on a ton of builds over the years, and I really like its throttle response and overall rideability. I did want to stay with the classic S&S teardrop air cleaner, so after a couple adapters and some modification to the classic shape I had exactly what I was looking for. The ignition is a Daytona Twin Tec unit that works with crank-trigger-style ignitions. You have to wire up a few plugs, but overall it is an easy bit of work and the Twin Tec ignition is extremely adjustable.

Accessories and lighting
I was trying to keep the old look of the bike but I couldn't help but upgrade to LED lighting. There isn't much for lighting on the bike, just a headlight and taillight, but because they are a Hogworkz Halomaker headlight and a Custom Dynamics LED taillight, you can see them both extremely well.
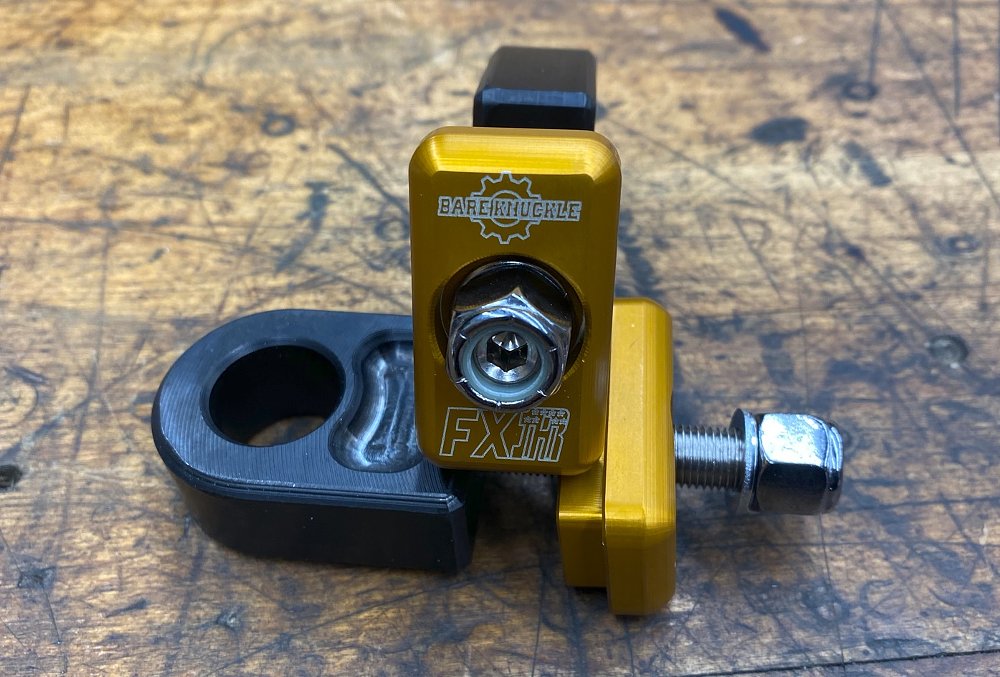
The rest of the bike is covered in small details that I think really pull it together. The Alloy Art billet front engine mount is too pretty to hide, so I took the time to move the voltage regulator under the transmission just to show it off. I added a few other gold Alloy Art bits in the form of their MX shifter peg and billet shift linkage. Another gold bit that is a huge upgrade from stock is the Bareknuckle Performance axle adjusters. The stock adjusters are absolute garbage and these not only look amazing but are also much more durable than the flimsy stock adjusters. Holding the wheel in place with those same adjusters is another Bareknuckle part. Their stainless steel axle kit really rounds that area of the bike out and makes it as strong as possible.
In the cockpit area I kept things simple, real simple. There are no switches on the bars, just two buttons I set in the dash which was finished with a Scotch-Brite pad for that satin aluminum look. The one button starts the bike and the other stops it. With no gauges to speak of, my phone mounted to my bars via a Quadlock mount will serve as my speedo. Rounding out the cockpit area I put a Biltwell EXFIL 7 bag on the handlebar to keep me flush with snacks for my rides.
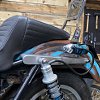
I left the stock sissy bar on the bike for two reasons: because my wife enjoys it and it has a huge brass Harley-Davidson eagle that matches the old gas cap. Can't ask for better reasons than that. The seat is a Lepera Kickflip step-up-style seat with a tuck-and-roll finish that looks amazing and is extremely comfortable.
Sheet metal, paint and the finished product
The only piece of sheet metal that isn't stock is that same T-Sport-style fairing I scored years ago at the J&P Cycles clearance tent, complete with the broken windscreen zip-tied together. I needed a paint job to complete my restomod build so I reached out to my buddy Danny Hendricks down the road in Sheridan, Wyoming, and asked him to do something he had never done before. Danny's paint jobs are typically heavy metal flake, bright colors, and eye-popping designs and I asked him to paint this bike so it looked like we just dragged it out of a barn after 30 years of sitting. Boy did he come through.
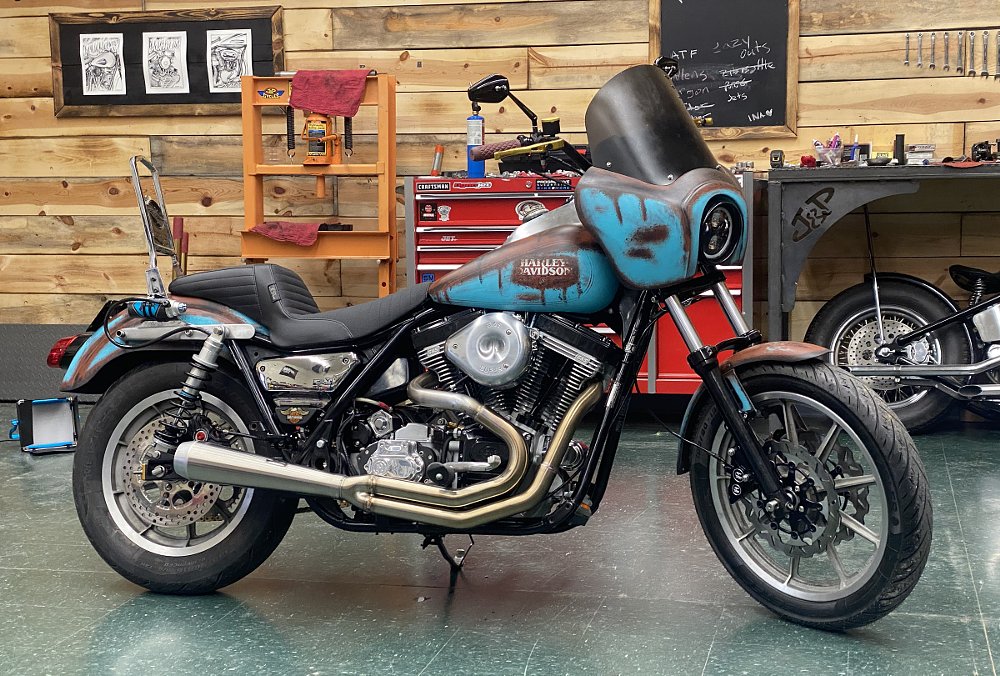
I'm sure it has been done on a bike before but I sure don't remember seeing a bike like this and it turned out exactly like I wanted, an old, tired-looking hot rod on the outside but absolutely packed with American-made performance underneath.
The truth is that FXRs are old as hell and honestly don't work very well. I was able to gut the bike but keep its soul and replace all the lame stock pieces with honest-to-goodness performance pieces. I'm stoked on the way it turned out and can't wait to start crushing miles with it.